

How to connect your number via SIP
JivoChat allows you to connect external SIP in order to use JivoChat to receive and make calls using your already existing SIP provider. If you have a VoIP number with SIP and want to use it in JivoChat to receive and make calls, follow the steps below in order to connect your number in JivoChat via SIP.
*IMPORTANT: This feature is only available via the Telephony Plus module. Please check our tutorial for more information.*
General settings#
1. First, you'll need to create a SIP channel in JivoChat. To do that, go to the JivoChat web app or one of our Desktop apps, go to "Manage" -> "Channels", find "Phone number" option and click "Connect".

2. Click to "Connect your own number via SIP".

3. Insert the SIP settings data from your account with your current provider.
Where can I get this data? Check below our instructions for popular providers:
4. If the data was inserted correctly, the "Connect" button will turn green. Choose if you'd like to assign all existing agents in the account to the channel in order for all of them to receive calls, or unmark the option to be able to assign only specific agents to it, then press "Connect" to finish.

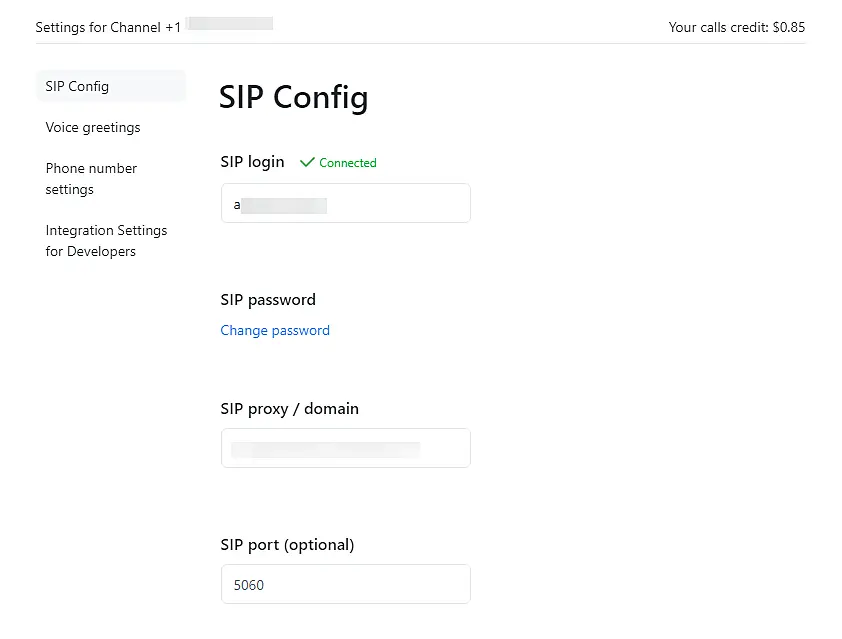
5. The channel is now created and you'll be redirected to the channel's "Settings" menu. In there, you will see the connection status. It may take several minutes for the connection to be established. To update the current status to verify if the status has changed, click the "Update" button.

6. If you receive an error after attempting to connect your SIP credentials, please check the settings. If anything is wrong, make any necessary changes and the connection will restart automatically. If the fixes do not help, please contact our technical support.

7. If the settings are correct, you will see the "Connected" status when the connection is completed.
Connecting Twilio#
Creating a SIP Domain
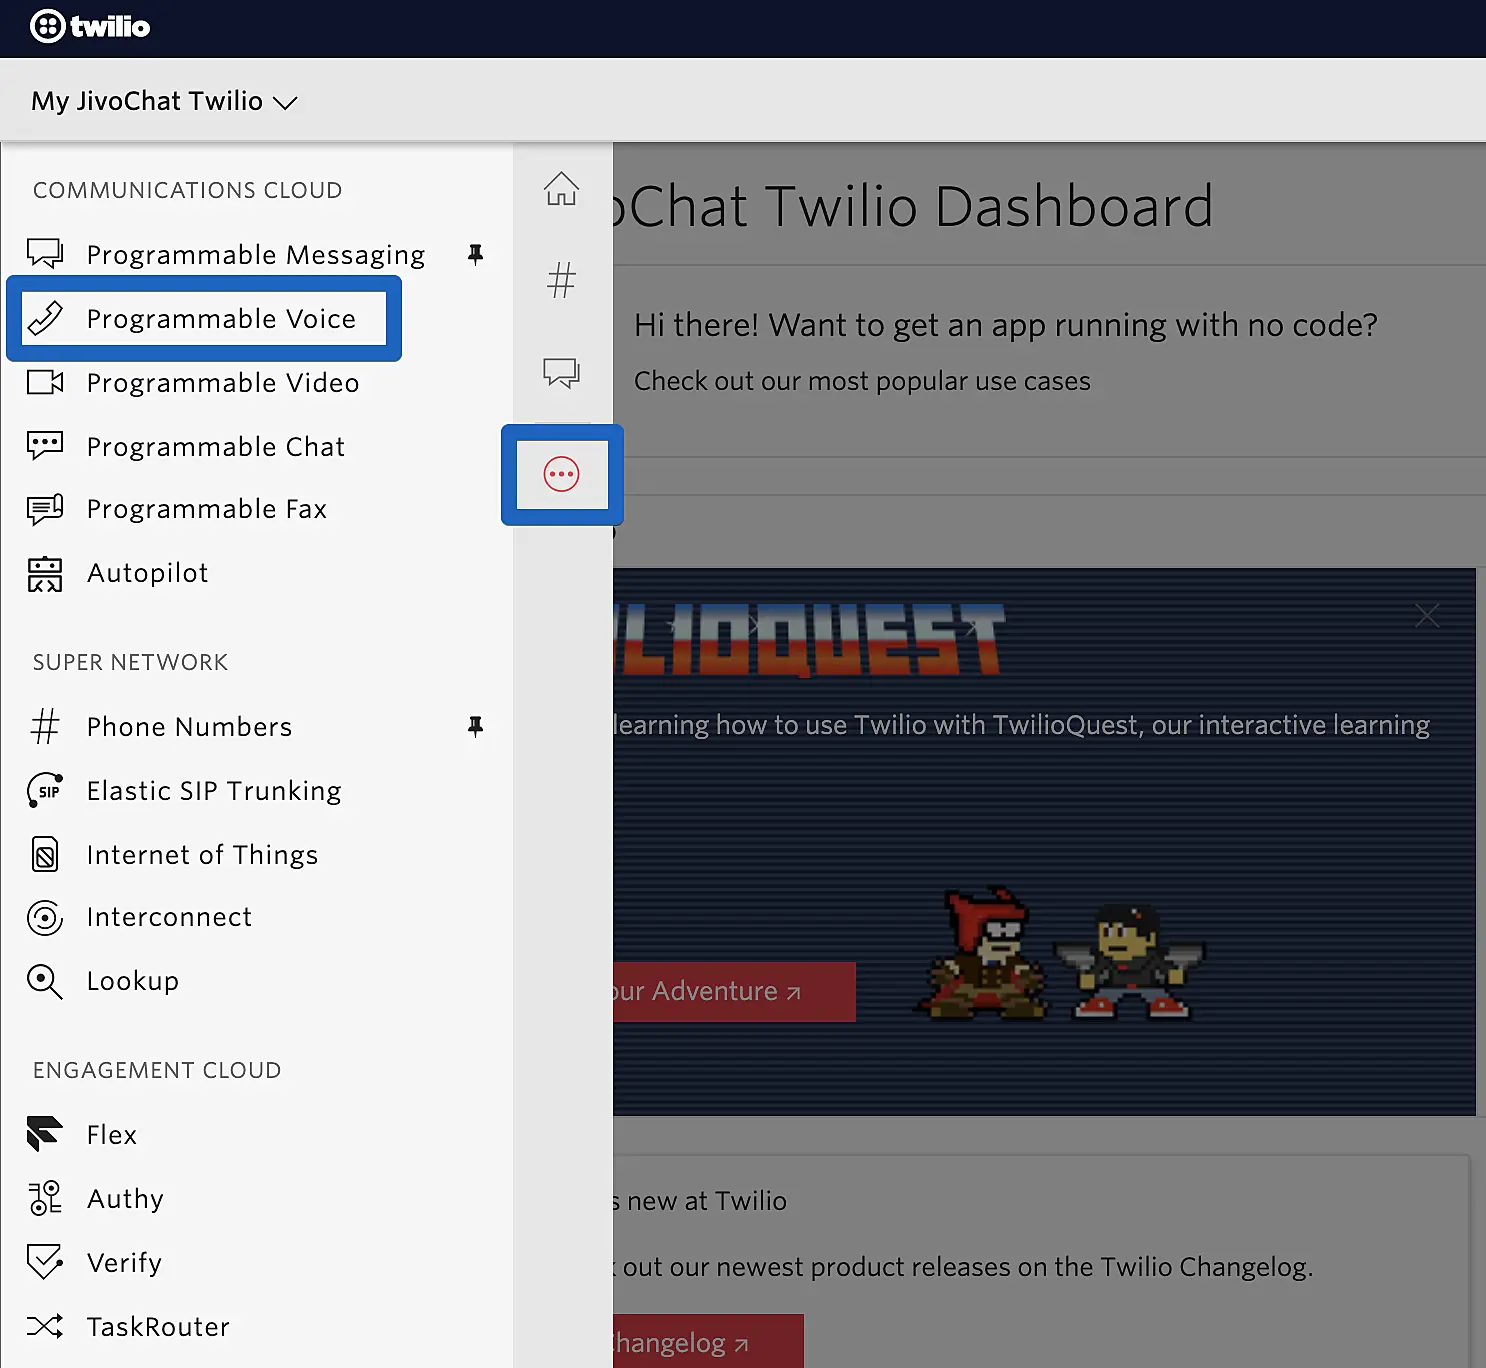
1. Go to your Twilio account and access the "Programmable Voice" menu.
2. Go to "SIP Domains" -> "Domains" and click the plus button to create a new domain.

3. Fill in the following sections and fields:
-
Properties:
- Friendly name - insert any name you prefer
- SIP URI - insert any name you prefer to be used in the SIP address

-
Voice authentication:
- IP access control list - optional
- Credential lists - select an existing credential or create a new one

-
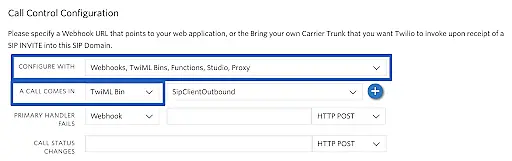
Call control configuration:
- Configure with - select "Webhooks, TwiML Bins, Functions, Studio, Proxy"
- A call comes in - select "TwiML Bin"
- Primary handler fails - optional
- Call status changes - optional
-
Secure media - optional
-
SIP registration:
- Set it to "Enabled"
- Credentials lists - select the credential you created in the "Voice authentication" section

- Emergency calling - optional
4. Click "Save" to finish setting up your SIP domain.
Adding TwiML Bin for outgoing calls
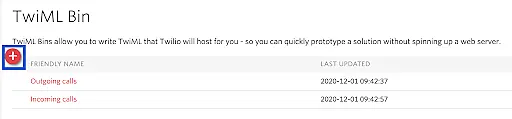
1. Access the "TwiML Bins" menu.

2. Click + to create a new Bin.

3. Fill in the following fields:
- Friendly name - insert any simple name such as "Outgoing calls"
- TWIML - copy and paste the code below into the field:
<?xml version="1.0" encoding="UTF-8"?>
<Response>
<Dial answerOnBridge="true" callerId="+00000000000"> {{#e164}}{{To}}{{/e164}} </Dial>
</Response>
Make sure to change the value +00000000000 for your actual number
4. Click "Create" to finish this step.

5 Return to the "SIP domain" that you've created during the "Creating SIP domain" steps.
6. Find the "Call control configuration" section once again.
7. In the "A call comes in" field, select the TwiML Bin that you just created, then press "Save" to save your changes.

Adding TwiML Bin for incoming calls
1. Return to the "TwiML Bins" menu.
2. Click + again to create one more Bin.
3. Fill in the following fields:
- Friendly name - insert any simple name such as "Incoming calls"
- TWIML - copy and paste the code below into the field:
<?xml version="1.0" encoding="UTF-8"?>
<Response>
<Dial answerOnBridge="true">
<Sip>
sip_login@domain_name.sip.us1.twilio.com
</Sip>
</Dial>
</Response>
Make sure to change the following data in the code that you pasted:
- Change the sip_login with the login from the credentials you've created in your SIP domain
- Change the domain_name with the SIP URI domain name you've created in your SIP domain
- Confirm that the text "us1." was added to your SIP URI (this part is necessary since Twilio only supports URI with the format "sip.us1.twilio.com" for SIP registration processes)
4. Click "Create" to finish.

5. Now, go to "Phone numbers" -> "Manage numbers" -> "Active Numbers" -> Select an active number that you want to connect to JivoChat.

6. Access the "Voice and Fax" section and set it up like this:
- Configure with - select "Webhooks, TwiML Bins, Functions, Studio, Proxy"
- A call comes in - select the TwiML Bin you've created for incoming calls
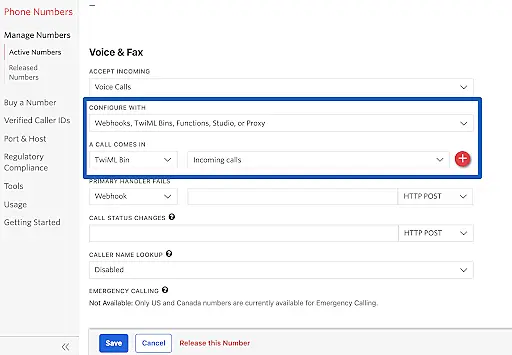
7. Click "Save".
Connect your Twilio SIP to JivoChat
1. First, you'll need to create a SIP channel in JivoChat. To do that, go to the JivoChat web app or one of our Desktop apps, go to "Manage" -> "Channels", find "Phone number" option and click "Connect".

2. Click to "Connect your own number via SIP".
3. Copy the following data from your Twilio account and paste it into JivoChat:
- Connected phone number
- Country of connected number
- SIP login and password (login and password from your Twilio credentials)
- SIP proxy/domain (this field is called SIP URI on Twilio. Make sure that you've added the "us1." to it, as in the following example: sip_uri_name.sip.**us1.**twilio.com)
- SIP port (optional)
Choose to assign all agents in the account to the channel or unmark this option to assign only specific agents to it, then press "Connect" to finish.

Wait up to 1-2 minutes for the connection to be made and that's it. If the data inserted is correct, the new SIP channel will be created and available inside your "Channels" list in your JivoChat app. You now may use your Twilio phone in JivoChat to make and receive calls.
Connecting Zadarma#
Find and copy your SIP data
1. Access your Zadarma account and go to "Settings" -> "SIP Connection".

2. Select a number from the list or create a new one.
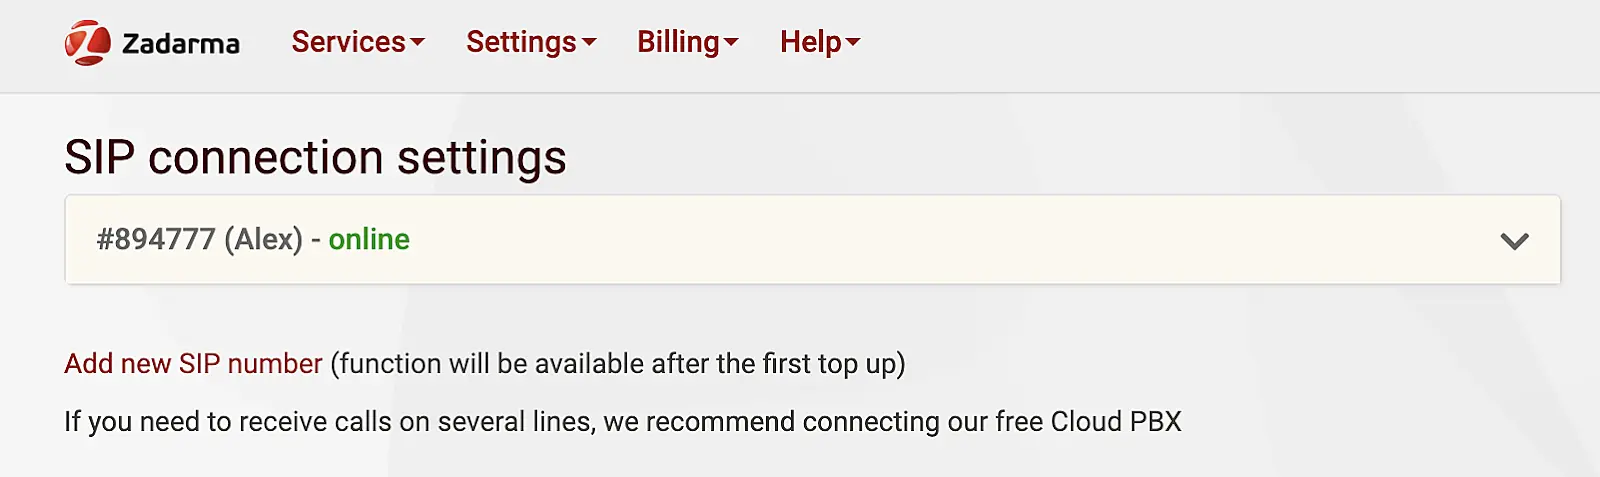
3. Here you'll find your SIP data. Keep this page open and move to the next step. You'll need this data to connect your SIP to JivoChat.

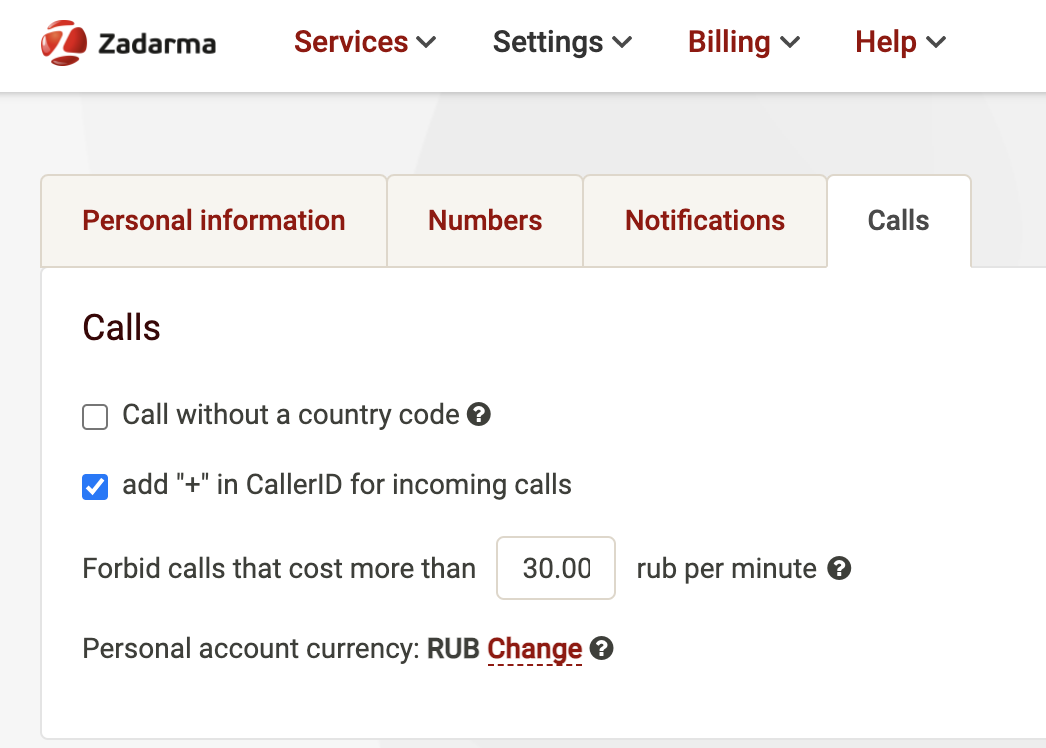
3. Go to Settings -> My profile -> Calls and make sure that "Call without a country code" checkbox is off:
!](https://images.jivosite.com/help/sip-channel/en/zadarma_4_w2vufc.png)
Connecting your Zadarma SIP to JivoChat
1. First, you'll need to create a SIP channel in JivoChat. To do that, go to the JivoChat web app or one of our Desktop apps, go to "Manage" -> "Channels", find "Phone number" option and click "Connect".
2. Click to "Connect your own number via SIP".
3. Copy the following data from your Zadarma account and paste it into JivoChat:
- Connected phone number
- Country of connected number
- SIP login and password (login and password from your Zadarma SIP settings)
- SIP proxy/domain ("Server" field from your Zadarma SIP settings)
- SIP port (optional)
Choose to assign all agents in the account to the channel or unmark this option to assign only specific agents to it, then press "Connect" to finish.
Wait up to 1-2 minutes for the connection to be made and that's it. If the data inserted is correct, the new SIP channel will be created and available inside your "Channels" list in your JivoChat app. You now may use your Zadarma phone in JivoChat to make and receive calls.
We wish you a very productive day!

