How to set up triggers in JivoChat
You can set up triggers in JivoChat in the web application or Desktop App by going to Manage -> Channels -> Settings (next to the channel name) –> Triggers.
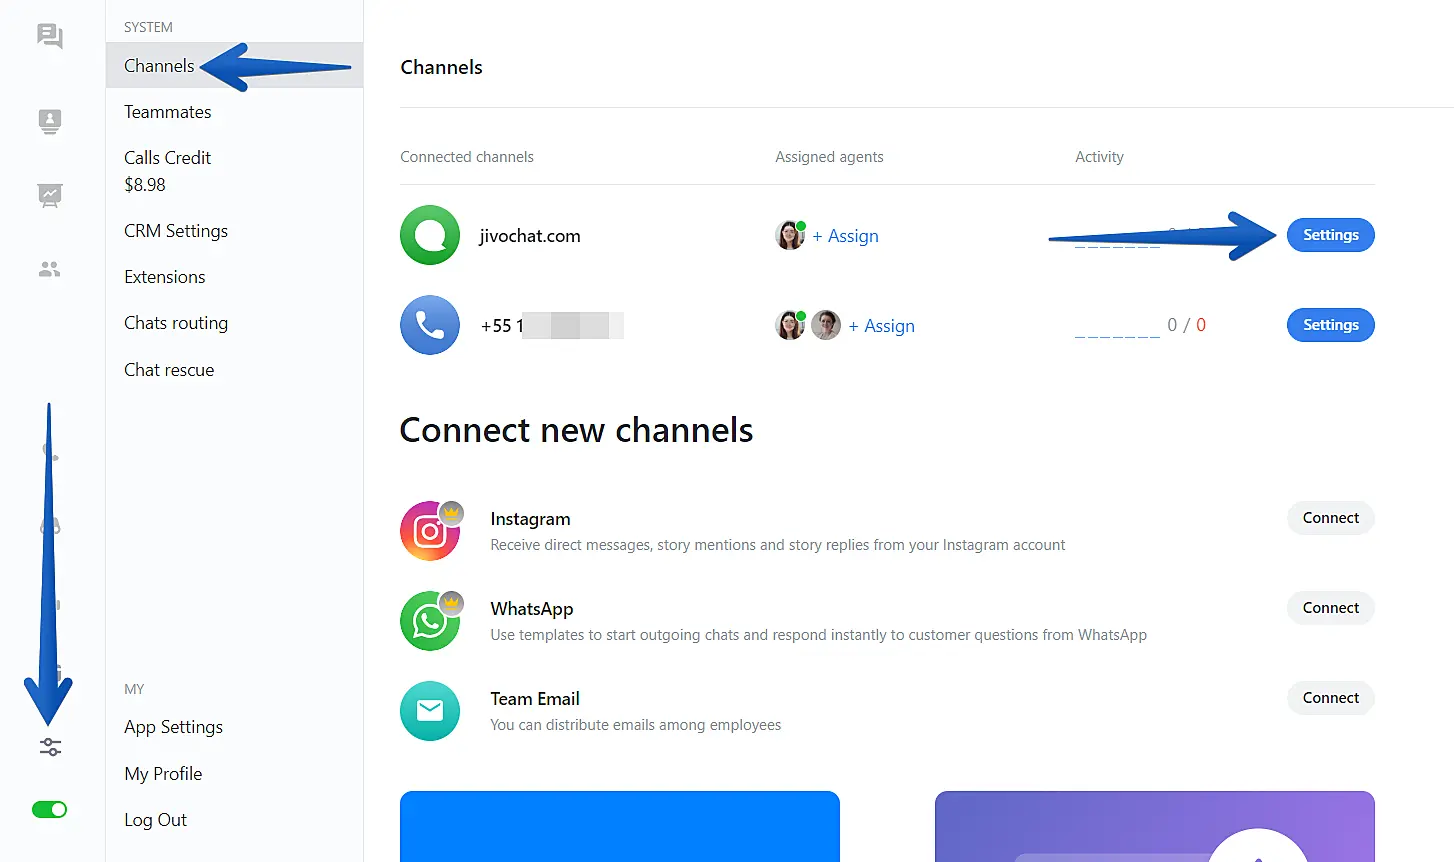
Then, when accessing the channel settings, choose Triggers:

1. How to set a trigger#
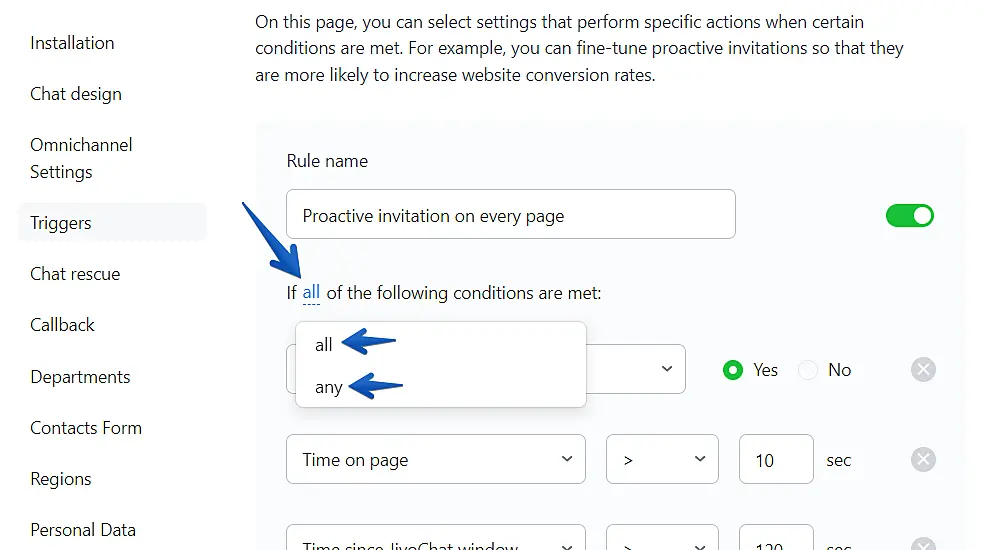
Our system has two different types of options:
Any: This option causes automatic activity to occur if at least one of the conditions is true.
All: This option causes automatic activity to occur only if all conditions are true. This is the default setting.
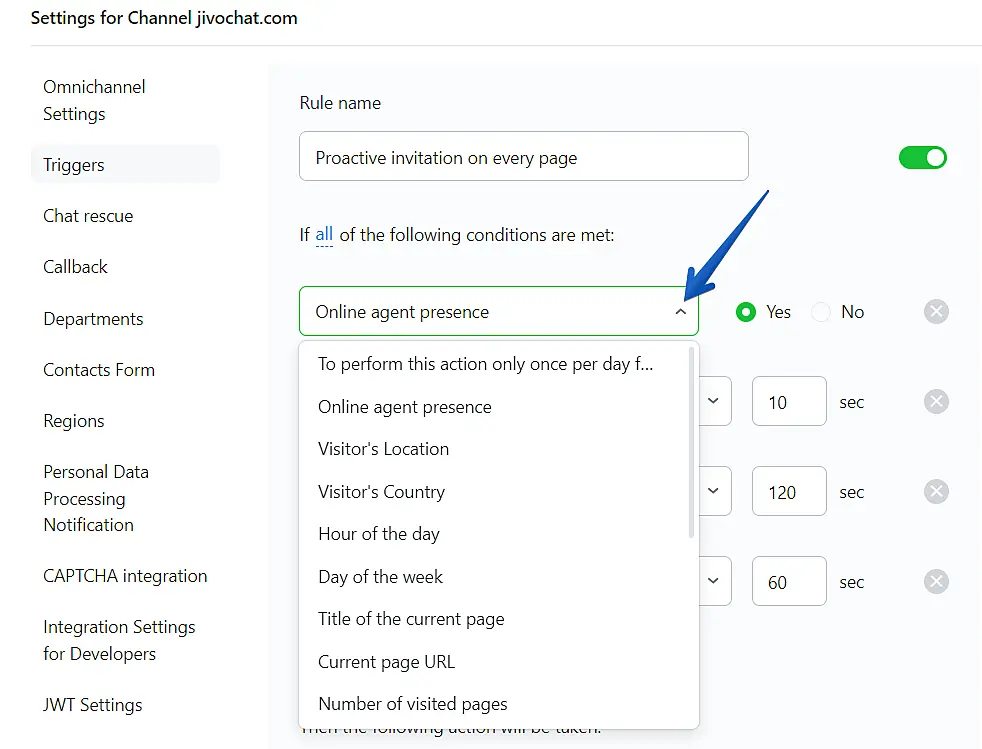
List of conditions for automatic actions:
To perform this action only once per day for one visitor – This condition speaks for itself. After the action is completed, it will not bother the visitor for the next 24 hours.
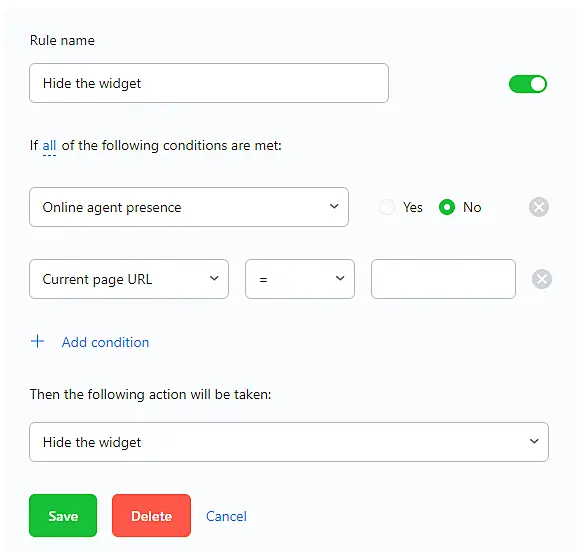
Online agent presence – this helps the system to understand what type of chat widget should be used. If you choose "NO", it will work for the offline-form, and if you choose "Yes" it will work for the online form. This condition is necessary for each trigger except for the "Hide the widget" action.
Visitor’s Location – this condition allows the trigger to apply only to customers in a specific city. If you would like to set a large number of cities, it is better to use the "Regions" function.
Visitor’s Country - this condition allows the trigger to apply only to customers in a specific country. If you would like to set a large number of countries, it is better to use the "Regions" function.
Hour of the day – this condition allows you to specify the time of the day when the trigger should work. If you don't use this condition, the trigger will work around the clock. Warning: this condition uses the time based on the customer's settings, NOT the time setting in your admin panel.
Day of the week – this condition allows you to specify the day of the week when the trigger should work. If you don’t use this condition, the trigger will work every day. Warning: the week is counted from Monday to Sunday, i.e. if you want to set a trigger to work only on weekends, you can, for example, use a "day of the week" condition with a greater than Friday configuration, affecting only Saturdays and Sundays.
Title of the current page – this condition checks the title of the page, using TRUE or FALSE scenarios. If you use "contains/does not contain" you can use just fragments of your title. The title is the text between <title>…</title> of your page.
Current page URL – this condition checks the URL of the page, using TRUE or FALSE scenarios. If you use "contains/does not contain" you can use just fragments of your URL. The URL is your page path, such as: https://www.jivochat.com/help
Number of visited pages – this condition allows you to set the number of pages (following the links on your site) that the user needs to visit before the trigger is launched. We count pages starting from zero. Hence, if you set 2, the trigger will work on the 3rd page.
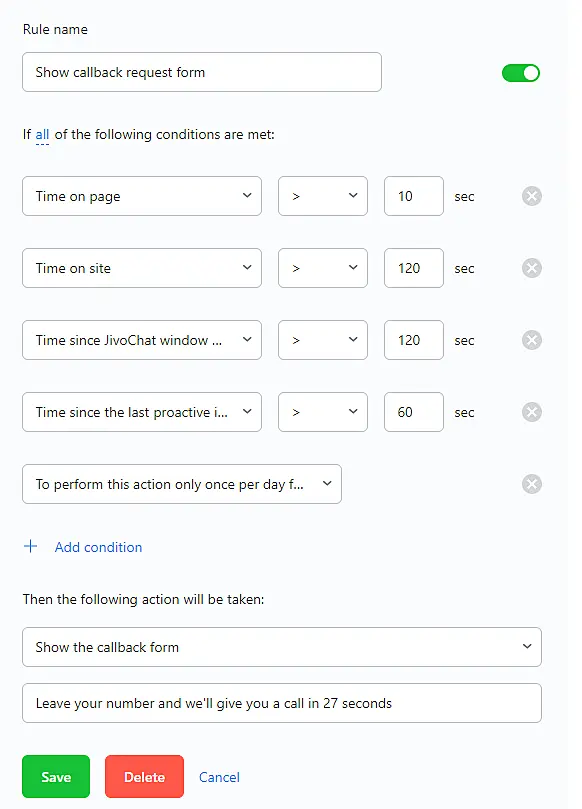
Time on page – set up a time which the user must spend on the current page before the trigger is launched. If the visitor goes to another page, this condition starts from the beginning.
Time on site - set up a time which the user must spend on the site before the trigger is launched. If a visitor goes to another page on the site, this condition continues to work without any break.
Time since JivoChat window was closed – this condition helps you to protect your visitors from receiving unlimited triggers. If the visitor clicked the closing "x" button on the widget, the next trigger will work after "Time since JivoChat window was closed" is expired.
Time since the visitor's first message – Defines the time at which the message will appear in the chat if the operator does not accept the dialogue. The condition works for the result "Display system message in chat." It does not support other results.
Time since the last proactive invitation – this condition helps you to protect your visitors from receiving unlimited triggers. If the visitor ignores the chat widget and goes to another page, the next trigger will work after "Time since the last proactive invitation" is expired.
The number of visits – Our widget can recognize visitors on your site and count how many times they were on it. So you can use this condition if you want to specify the number of times the visitor must visit your website before the trigger is shown. The first visit is 1; the second is 2 and so on.
Scroll position – Launch the trigger after the visitor scrolls down your site. The condition takes percentages for its Index. Hence, 100 – is 100% scrolled down your page (complete scroll from top to bottom).
Mouse cursor crossed top corner on the window – This condition marks a special area at the top right corner, where the close window button is located. When the visitor tries to close your site and moves his mouse to the corner, the trigger will launch.
A/B Group – This is a special option to test different settings of your triggers. If you set up 2 triggers that affect the same pages and insert on each of them a condition A/B placing them on different groups, 50% of the visitors will receive one of the triggers and 50% will receive the other one. By doing that, you're able to check which text or time condition achieves better results in your chat. To check the statistics of each group, we recommend using Google Analytics as we send events regarding triggers directly to Analytics and from there you're able to filter which group had more events or better conversion results, for example. To learn more about our Google Analytics integration, please click here.
2.Conditions for system messages (action which will be taken):#
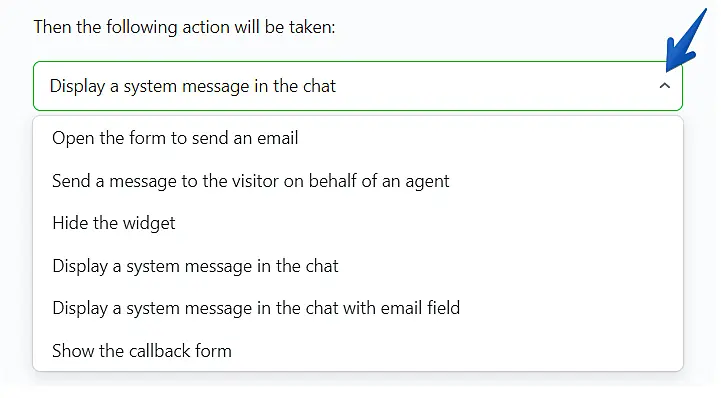
Open the form for sending an email – Automatically opens the JivoChat offline-form where the customer can leave his message. Condition "Presence of agents online: "No" is required.
Send a message to the visitor on behalf of an agent - Automatically sends an invitation to chat from agent to customer. The condition "Presence of agents online: "Yes" is required.
Hide the widget - Hide the widget on your site and switch off triggers. This can be useful to hide the widget on certain pages. Alternatively, you can hide the widget using the API and CSS.
Display a system message in chat – If a customer sends a message in chat, and the agent doesn't respond to it for a specified time, this trigger will show a special message to the customer. The condition "Presence of agents online: "Yes" is required.
Display a system message in the chat with the email field - If a customer sends a message in chat, and the agent doesn't respond to it for a specified time, this trigger will show an email field with a preset text. This email will be shown as contact information in the app. The condition "Presence of agents online": "Yes" is required.
Show the callback form - Automatically opens the callback form of JivoChat where the customer can leave his number. The callback feature should be switch on.
Examples#
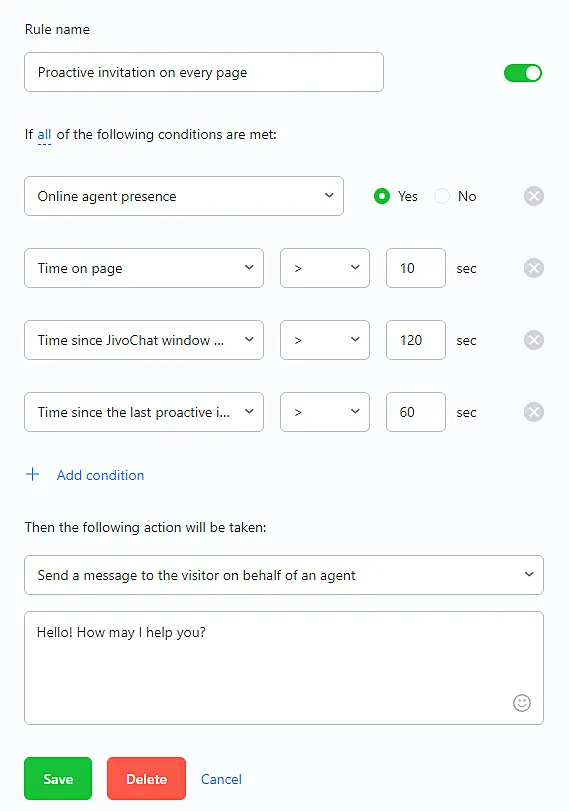
1.Send a message to the visitor on behalf of an agent
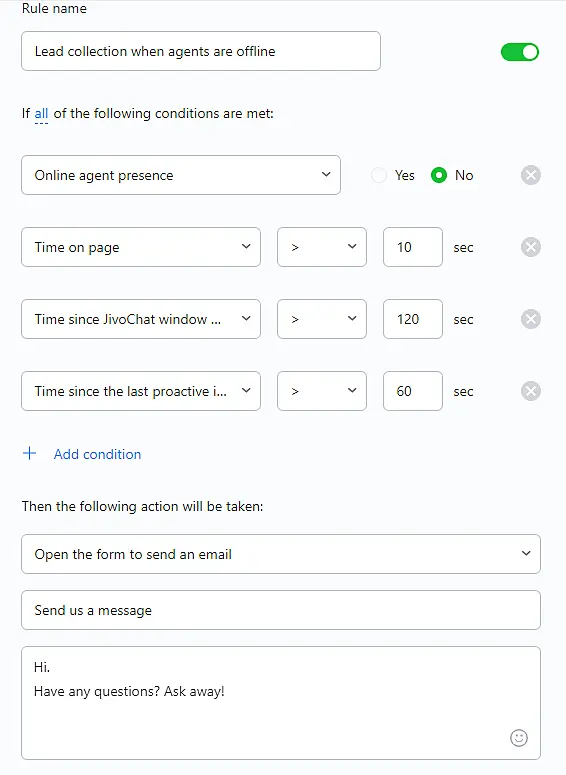
2.Open the form for sending an email
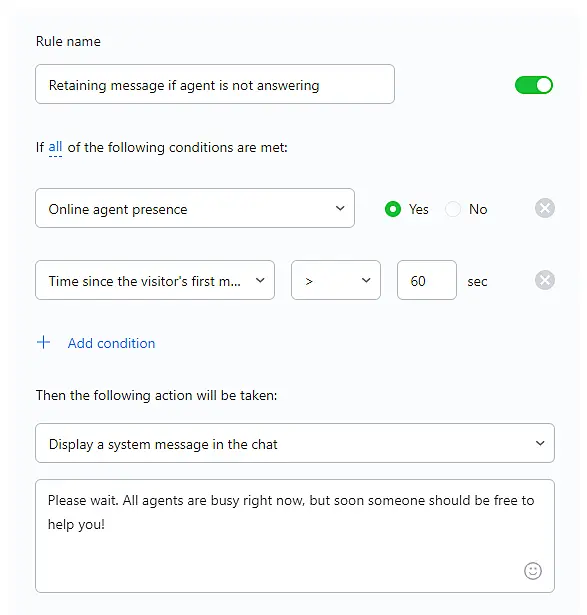
3.Display a system message in chat
4.Show the callback form
5.Hide the widget